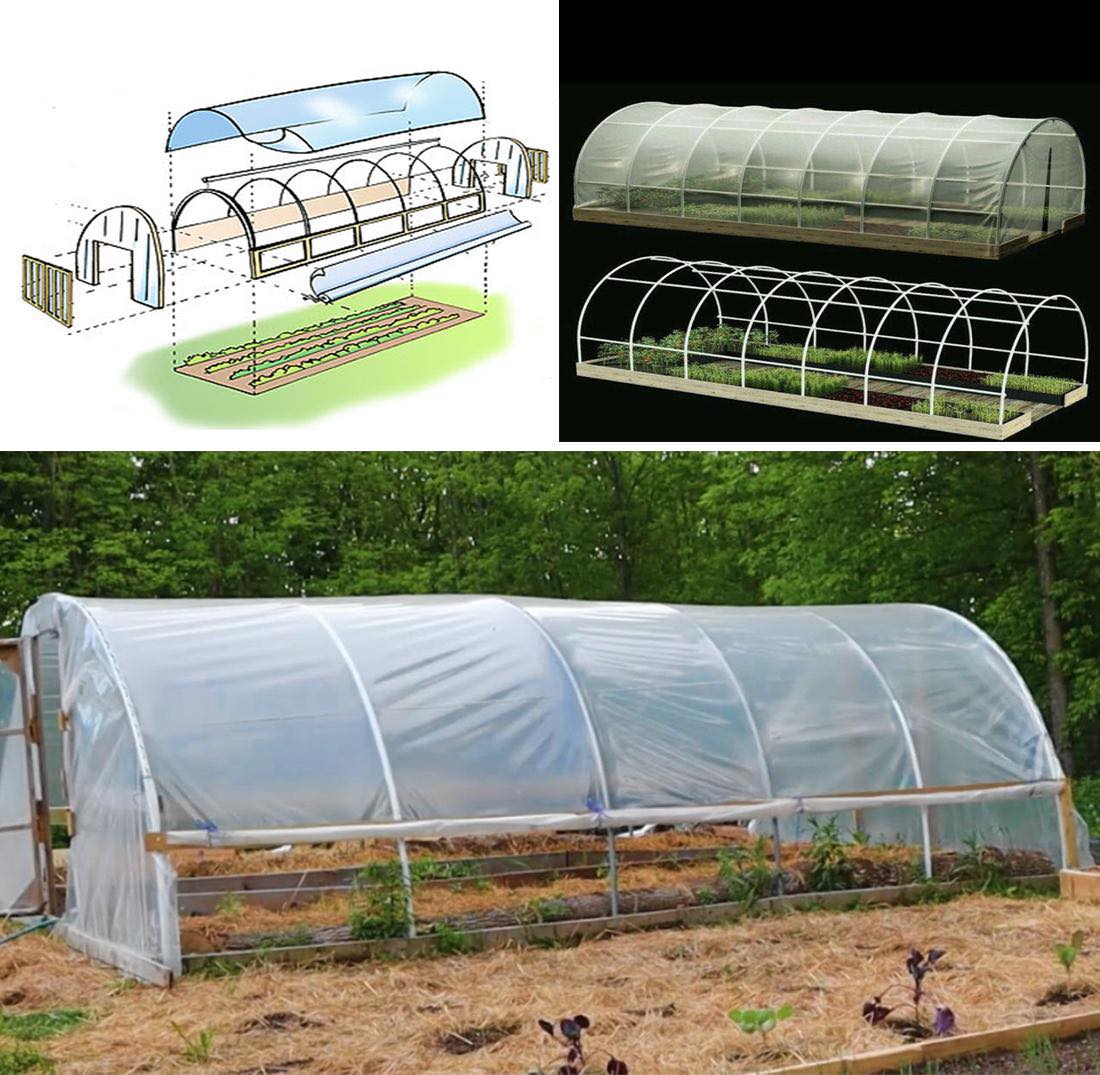
Creating a hinged hoophouse for your raised bed garden is an excellent project for extending the growing season and protecting your plants from adverse weather and pests. This guide will provide detailed instructions to help even beginners construct a functional and effective hoophouse.
Materials Needed:
- PVC pipes (1/2 inch diameter): These will form the arches of your hoophouse.
- Heavy-duty plastic sheeting (6 mil): This will cover the structure.
- Hinges: To allow the hoophouse to open and close.
- Stainless steel screws: For assembling the frame securely.
- Wooden planks: For constructing or reinforcing the raised bed.
- Pipe clamps: To secure the PVC pipes to the wooden frame.
- UV-resistant zip ties: For securing the plastic sheeting to the PVC pipes.
- Tools: You’ll need a drill, saw, measuring tape, and staple gun.
Step-by-Step Guide:
Step 1: Prepare Your Raised Bed
If not already built, construct your raised bed using wooden planks. Ensure it’s sturdy and positioned in a location that receives ample sunlight. The dimensions of your raised bed will determine the size of the hoophouse.
Step 2: Measure and Cut PVC Pipes
Cut PVC pipes to span the width of your raised bed, creating arches that will support the plastic sheeting. Space the hoops every 2-3 feet along the length of the bed. Secure the ends of the pipes into the ground on each side of the bed or use pipe clamps to attach them to the wooden frame.
Step 3: Install Hinges
Attach hinges to one side of the raised bed, which will serve as the base where the hoophouse will pivot open and closed. This setup allows easy access to the plants inside.
Step 4: Attach PVC Pipes to Hinges
On the hinged side of the bed, securely attach the PVC pipes using screws and pipe clamps. Ensure the structure can swing open smoothly and close with ease.
Step 5: Cover with Plastic Sheeting
Drape the heavy-duty plastic sheeting over the PVC hoops. Make sure there’s enough excess on all sides to fully cover the bed when closed.
Step 6: Secure the Plastic Sheeting
Use UV-resistant zip ties to tightly secure the plastic sheeting to the PVC pipes. Staple the plastic to the wooden frame on the hinged side, ensuring it remains taut and aligned. Bury the excess plastic in the soil on the fixed side and ends to protect against wind and pests.
Step 7: Final Adjustments
Test the functionality of your hoophouse by opening and closing it. Adjust the hinges, plastic, or frame as needed to ensure smooth operation and adequate coverage.
Step 8: Ventilation
To prevent overheating and ensure proper air circulation, consider adding ventilation options. You can roll up the sides of the plastic or install additional vents as needed.
Maintenance Tips:
- Regularly inspect the hoophouse for any signs of damage or wear, particularly after extreme weather.
- Replace the plastic sheeting when necessary to maintain clarity and durability.
- Lubricate the hinges periodically to keep them operating smoothly.
By following these steps, you’ll create a robust and versatile hinged hoophouse that will enhance your gardening efforts, allowing you to grow a variety of plants more effectively. This hoophouse will not only extend your growing season but also provide crucial protection for your plants, making it a valuable addition to any garden.