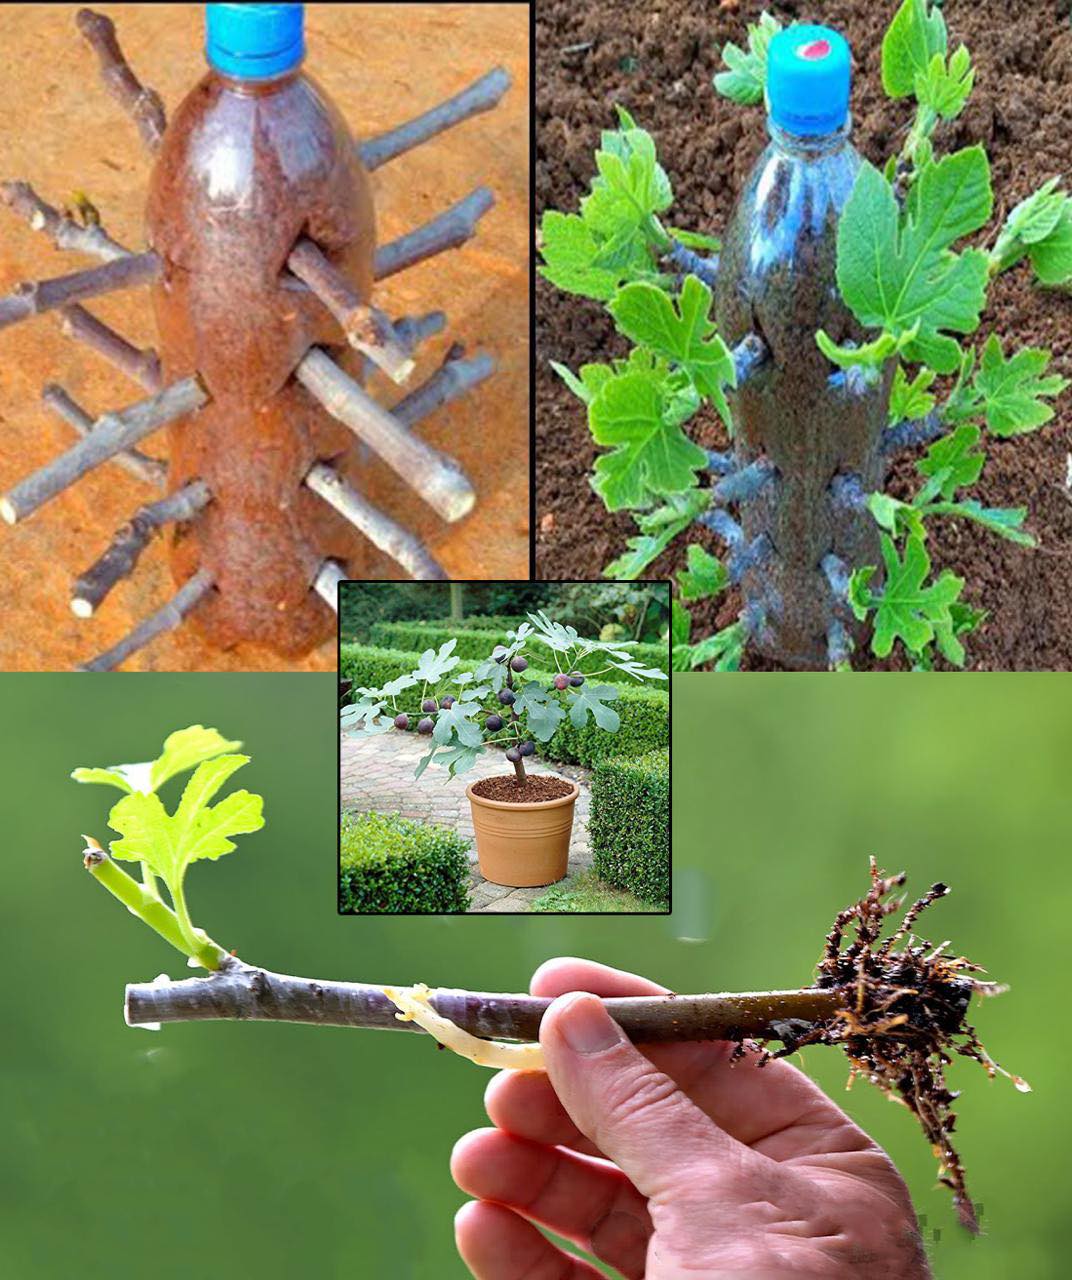
Growing your own fig trees from cuttings can be a fun and rewarding gardening project, especially when using a simple and creative method like the one we’ll describe using a 2-liter plastic bottle. This technique minimizes hassle and maximizes success. Here’s how to do it:
Materials Needed:
- A 2-liter plastic bottle: Clean and empty.
- Sand or a well-draining potting mix: Ensures good moisture retention and aeration.
- Fig tree cuttings: 6-8 inches long, with several nodes.
- Rooting hormone (optional): Helps stimulate root growth.
- A sharp knife or scissors: For making cuts in the plastic bottle.
- Rubber bands or twine: To secure the plastic wrap or bag.
- A misting bottle or spray bottle: For maintaining humidity.
Steps:
Step 1: Prepare the Cuttings
- Select Healthy Cuttings: Choose robust, healthy fig cuttings about 6-8 inches long. Each cutting should have several nodes, which are crucial for root development.
- Apply Rooting Hormone: Dip the cut end of each cutting into rooting hormone to enhance root growth, though this step is optional.
Step 2: Create Plus Sign Openings
- Modify the Bottle: Using a sharp knife or scissors, make “+” sign cuts on each side of the 2-liter bottle. Ensure these openings are just big enough to snugly fit the cuttings without letting them slip through.
Step 3: Insert the Cuttings
- Insert Cuttings: Carefully insert the fig cuttings into the openings you’ve created, making sure they are secure and won’t fall out.
Step 4: Enclose and Maintain
- Seal the Environment: Cover the top of the bottle with plastic wrap or a clear plastic bag. Secure it with rubber bands or twine to create a miniature greenhouse environment inside the bottle, which helps maintain necessary humidity.
Step 5: Keep It Moist
- Maintain Moisture: Regularly mist the interior of the bottle and the cuttings using a misting bottle. This step is crucial for keeping the humidity high, which is vital for root development.
Step 6: Monitor Growth
- Check for Roots: Periodically check for root growth by gently tugging on the cuttings. Resistance usually indicates that roots have formed.
Step 7: Transplant
- Transplant Rooted Cuttings: Once the roots are well-established, carefully remove the cuttings from the bottle and transplant them into individual pots filled with potting mix or directly into your garden.
By following these steps, you’ll be able to propagate your own fig trees efficiently with minimal tools and effort. It’s a great way to multiply your fig collection or even start new trees to share with friends and family. Patience is essential, as it can take several weeks for roots to develop, but the process is very rewarding. Enjoy watching your fig trees grow!